Scenario 1: How to get form details before the submission

There are two approaches to access the form data once the user enters them:
- Access the individual form field values after the entire form is submitted
- Access the value of an individual form field as soon as it is changed or as the user types in. This approach allows you to take action without waiting until the form is submitted.
Depending on the task at hand, sometimes you have to combine both approaches or only one of them is enough to perform the job.
Here are a couple of scenarios:
- Instant form validation to provide immediate feedback to the user
- Process the form field data only after the form submission
In this lesson, we will talk briefly about scenario 1: Instant form validation.
Download the project files to follow along with me:
The Javascript file is empty, and the HTML file contains a basic form with fields related to user registration.
Scenario 1: Instant form validation to provide immediate feedback to the user
If you visit the Password Monster website and enter any password, it will give you immediate feedback about how strong the password is:
What you're seeing in the above video is instant field validation and its resulting feedback.
If you want to achieve this, you shouldn't wait until the user clicks the submit button.
Instead, you can achieve instant validation in four easy steps:
- Attach an event listener like
keyuporinputdirectly to the form field - Next, get access to the form field that triggered the event
- Then, get access to the form field's value that is currently being entered
- Finally, process the value and provide feedback to the user instantly
Step 1: Attach an event listener like keyup or input directly to the form field
const emailField = document.querySelector("#email");

emailField.addEventListener("keyup", function(event) {
  //...
});
In the above code, we are attaching the keyup event listener to the "Email" field.
The keyup event is triggered every time the user presses a key and releases it on the keyboard.

This way, when a character is being entered into the "Email" field, we can get instant access to it as the user types it.
Once you attach the event listener...
Step 2: Get access to the form field inside the event handler
const emailField = document.querySelector("#email");

emailField.addEventListener("keyup", function (event) {
  console.log(event.target);
});
If we utilize the event object inside the event handler, we can get access to the HTML element that triggered the event by using event.target object.
Inside the event handler, event.target always represent the HTML element that is responsible for generating the event.
For example, in the above video, "Email" is the field that the user is currently interacting with, and it generates the keyup event every time the user presses a character on the keyboard.
So, event.target represents the "Email" field. This is why you're seeing the email field in the browser console for the keystroke I put into the email field.
If the usage of event.target is confusing for you, you can also access the form field by selecting it manually:
const emailField = document.querySelector("#email");

emailField.addEventListener("keyup", function (event) {
  console.log(emailField);
});
Or you can use something called the this keyword:
const emailField = document.querySelector("#email");

emailField.addEventListener("keyup", function (event) {
  console.log(this);
});
The this keyword is a contextual keyword and the data it represents changes depending on where in the code we are using the keyword.
We will learn the this keyword in detail in a future lesson, but for now, just remember this:
After the event is generated and inside the event handler, just like event.target, the this keyword always represents the HTML element that is responsible for generating the event.
In our case, the "Email" field is responsible for generating the keyup event, right?
So, the this keyword represents the "Email" field in the form of a Javascript object.
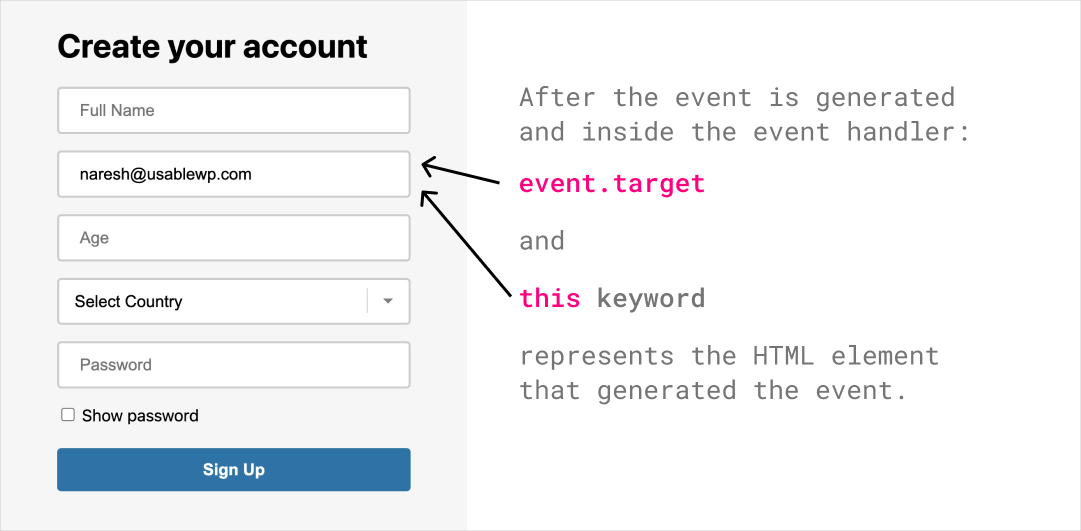
event.target and this represents the HTML element in the form of an object. Anyway, that's how you get access to the form field that generated the event.
Step 3: Access the user-entered value of the form field
If you remember, in step 2, we accessed the form field that generated the event using the following objects:
event.targetthis- Manually selecting the form field using the
document.querySelectormethod.
1) If you have accessed the form field using the event.target object, then you can call the event.target.value property to access the form field's value entered by the user:
const emailField = document.querySelector("#email");

emailField.addEventListener("keyup", function (event) {
  console.log(event.target.value);
});
2) Or, If you have accessed the form field using the this keyword, then you can call the this.value property to access the form field's value entered by the user:
const emailField = document.querySelector("#email");

emailField.addEventListener("keyup", function (event) {
  console.log(this);
});
3) Finally, If you have accessed the form field using the manual selection (document.querySelector) and then you can still call the value property on it:
const emailField = document.querySelector("#email");

emailField.addEventListener("keyup", function (event) {
  console.log(emailField.value);
}); event.target, this and fullNameField, all these objects are technically the same because they represent the same form field element that triggered the event.
So, calling the value property on any of those objects will return the same value.
If we want to provide instant for the other input fields, we have to repeat the above process for all the other input fields, too:
//Full Name Field
const fullNameField = document.querySelector("#full-name");

fullNameField.addEventListener("keyup", function (event) {
  console.log(event.target.value);
});

//Email Field
const emailField = document.querySelector("#email");

emailField.addEventListener("keyup", function (event) {
  console.log(event.target.value);
});

//Age Field
const ageField = document.querySelector("#age");

ageField.addEventListener("keyup", function (event) {
  console.log(event.target.value);
}); We will learn about loops in an upcoming module. What you're seeing above is not super efficient code.
value property can only be accessed on input field types like text, password, select, number, textarea, email, etc.If you want to get the value of a checkbox, then you must use the
checked property in the following way: event.target.checked or this.checked. More on this later.Step 4: Process the value and provide feedback
Now that we have live access to the data entered by the user, we can process the data and provide feedback.
We can't do this right now because we didn't learn about advanced concepts yet.
In the next lesson, we will learn how to get the form details after submission.